
KT Tape for Patellar Tendonitis: A Comprehensive Guide
Navigating knee discomfort? This guide details utilizing KT tape, offering relief and support for patellar tendonitis, enhancing recovery effectively․
Understanding Patellar Tendonitis
Patellar tendonitis, commonly known as “jumper’s knee,” is an inflammation of the patellar tendon, connecting your kneecap (patella) to your shinbone (tibia)․ This overuse injury frequently affects athletes participating in jumping sports – basketball, volleyball, and running – but can also occur in individuals with physically demanding jobs․
The condition develops gradually from repetitive strain on the tendon, leading to microscopic tears․ Symptoms typically include pain just below the kneecap, worsening with activity․ Initially, pain may only be present after exercise, but it can progress to pain during activity and even at rest․
Ignoring early signs can lead to chronic pain and decreased function․ Understanding the underlying cause and implementing appropriate treatment strategies, including options like KT taping, is crucial for effective management and a return to desired activity levels․ Early intervention is key to preventing long-term complications․
What is KT Tape?
KT Tape, short for Kinesiology Therapeutic Tape, is an elastic cotton strip with an acrylic adhesive backing․ Developed in the late 1970s, it’s designed to mimic the elasticity of human skin, allowing for a full range of motion․ Unlike traditional athletic tape, KT Tape doesn’t restrict movement; instead, it supports muscles and joints while enabling natural movement patterns․
Its unique properties stem from its recoil and stretch capabilities․ When applied correctly, KT Tape lifts the skin, creating microscopic space, which is believed to improve blood flow and lymphatic drainage․ This can help reduce swelling and pain․
Available in various colors and widths, KT Tape is widely used by athletes, physical therapists, and individuals seeking pain relief and support for a variety of musculoskeletal conditions, including patellar tendonitis․ It’s a relatively inexpensive and accessible self-treatment option․
How KT Tape Works – The Mechanisms
KT Tape’s effectiveness isn’t about providing rigid support; it’s a more nuanced process․ Primarily, it works through several key mechanisms․ Lifting the skin with the tape creates space between the skin and underlying tissues, potentially reducing pressure on pain receptors and improving local circulation․
This decompression effect can also enhance lymphatic drainage, helping to remove inflammatory byproducts from the injured area․ Furthermore, the elastic recoil of the tape gently pulls on the skin, providing proprioceptive feedback – essentially, improving the body’s awareness of joint position and movement․
By stimulating these cutaneous receptors, KT Tape can influence muscle activation patterns and potentially reduce pain signals sent to the brain, contributing to improved function and reduced discomfort during activity․
KT Tape Materials and Properties
KT Tape is typically constructed from a proprietary blend of cotton and spandex, creating a highly elastic and breathable material․ This composition closely mimics the elasticity of human skin, allowing for a full range of motion while providing support․ The adhesive used is crucial; it’s designed to be strong enough to stay in place during activity, yet gentle enough to minimize skin irritation․
Importantly, KT Tape is water-resistant, meaning it can withstand sweat and even be worn during showering or swimming, though prolonged submersion should be avoided․ The tape’s breathability helps prevent moisture buildup, reducing the risk of skin maceration․ Different brands may vary slightly in their exact composition and adhesive strength․
The quality of the materials directly impacts the tape’s effectiveness and comfort, so choosing a reputable brand is recommended․
Benefits of Using KT Tape for Patellar Tendonitis
KT Tape offers several potential benefits for individuals suffering from patellar tendonitis․ Primarily, it can help to reduce pain and inflammation around the knee joint, allowing for increased comfort during daily activities․ The tape’s supportive properties can offload stress from the patellar tendon, promoting healing and preventing further aggravation․
Furthermore, KT Tape can improve muscle function by facilitating proper tracking of the patella and enhancing neuromuscular control․ This can lead to improved biomechanics and reduced strain on the tendon․ By stimulating sensory receptors in the skin, KT Tape also enhances proprioception – your body’s awareness of its position in space – contributing to better stability and coordination․

However, it’s crucial to remember KT Tape is often most effective when used in conjunction with other treatments․
Pain Reduction & Management
KT Tape’s application directly influences pain perception in patellar tendonitis sufferers․ By gently lifting the skin, it creates space between the skin and the tissues below, potentially reducing compression on pain receptors․ This decompression effect can alleviate discomfort during movement and at rest․
Additionally, the tape’s elastic properties provide a mild, constant compression that can help to minimize swelling and inflammation – key contributors to pain; The support offered by KT Tape can also reduce abnormal stresses on the patellar tendon, lessening irritation and allowing for a more comfortable range of motion․
It’s important to note that pain relief from KT Tape is often temporary and symptom management focused; addressing the underlying cause is vital․
Improved Muscle Function & Support
KT Tape assists in optimizing muscle function around the knee joint when dealing with patellar tendonitis․ The tape’s application can provide external support to the quadriceps and hamstring muscles, aiding in their ability to stabilize the knee and absorb shock during activities․
This support doesn’t replace the need for strengthening exercises, but it can facilitate better movement patterns and reduce the strain on the injured patellar tendon․ By providing a proprioceptive cue, KT Tape can encourage proper muscle activation, improving overall biomechanics․
Furthermore, the gentle lift created by the tape can reduce muscle inhibition, allowing for a more efficient and coordinated muscle contraction, ultimately supporting improved function․
Enhanced Proprioception (Body Awareness)
Proprioception, your body’s ability to sense its position and movement in space, is often compromised with patellar tendonitis due to pain and inflammation․ KT Tape application stimulates cutaneous receptors, essentially ‘waking up’ the nervous system and improving this crucial sense․
This heightened awareness allows for better control and coordination of movements, reducing the risk of re-injury․ The tape provides continuous feedback to the brain regarding joint position, even during dynamic activities․
Consequently, individuals may experience improved balance, agility, and a more natural gait pattern․ By enhancing proprioception, KT Tape helps restore optimal neuromuscular control, contributing to a more effective rehabilitation process and a quicker return to function․
Contraindications & Precautions
While KT Tape is generally safe, certain conditions warrant caution or preclude its use․ Individuals with open wounds, skin infections, or significant skin irritation should avoid application․ Those with fragile skin, or who are undergoing treatment for deep vein thrombosis (DVT), require medical clearance․
Allergic reactions to the adhesive are possible; test a small area first․ Diabetics and individuals with peripheral vascular disease should use KT Tape cautiously due to potential circulation concerns․
Avoid applying tape directly over varicose veins or areas of numbness․ Monitor the skin regularly for any signs of adverse reaction, such as redness, itching, or blistering․ If symptoms develop, remove the tape immediately and consult a healthcare professional․
When to Seek Professional Medical Advice
KT Tape can provide symptomatic relief, but it’s not a substitute for professional medical evaluation․ Consult a doctor or physical therapist if your pain is severe, doesn’t improve after several days of KT Tape use, or worsens with activity․
Seek immediate medical attention if you experience numbness, tingling, or significant swelling around the knee․ A professional can accurately diagnose the cause of your pain and rule out more serious conditions, like a tear or fracture․
Don’t self-treat if you suspect a structural injury․ A qualified healthcare provider can develop a comprehensive treatment plan, including appropriate exercises and rehabilitation strategies, to address the underlying issue and prevent recurrence․
KT Tape Application: Preparation is Key
Successful KT Tape application for patellar tendonitis hinges on proper preparation․ Ignoring these steps can compromise adhesion and effectiveness, potentially leading to skin irritation or suboptimal support․ Before applying any tape, ensure the skin is clean, dry, and free of oils, lotions, or sweat․
This creates an ideal surface for the adhesive to bond․ Shaving the area where the tape will be applied is also recommended, especially for individuals with significant hair growth, as hair interferes with adhesion․ Accurate measurement and cutting of the KT Tape strips are crucial for a tailored fit․
Using scissors, round the corners of the strips to prevent premature peeling․ Proper preparation maximizes the benefits of KT Tape and minimizes potential complications․
Skin Preparation – Cleaning & Shaving
Optimal KT Tape adhesion begins with meticulous skin preparation․ Thoroughly cleanse the application area around the patellar tendon with mild soap and water to remove any dirt, oils, or lotions․ Ensure the skin is completely dry before proceeding; moisture significantly reduces adhesive effectiveness․ For individuals with substantial hair growth, shaving the area is highly recommended․
Hair interferes with the tape’s ability to make direct contact with the skin, compromising support and increasing the risk of lifting or peeling․ Use a razor to carefully shave in the direction of hair growth, avoiding nicks or irritation․ After shaving, gently wipe the area to remove any remaining hair or stubble․ Properly prepared skin ensures a secure and comfortable KT Tape application․
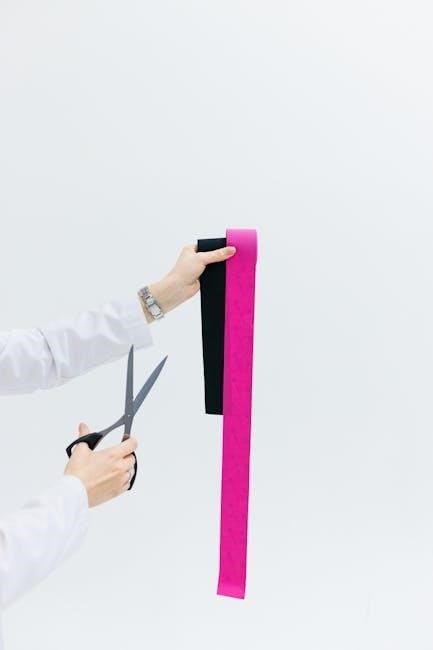
KT Tape Strip Measurement & Cutting
Accurate strip measurement and precise cutting are crucial for effective KT Tape application․ Generally, for patellar tendonitis, you’ll need strips approximately 6-8 inches (15-20 cm) long, depending on the individual’s size and the specific application technique․ To measure, anchor one end of the tape at the point of origin and extend it along the path of the patellar tendon to the insertion point, adding a few extra inches for anchors․
Use KT Tape’s pre-cut strips or carefully measure and cut strips with scissors, rounding the corners to prevent premature peeling․ Rounded corners minimize the chance of the tape catching on clothing or skin․ Avoid stretching the tape during measurement or cutting, as this can alter its properties․ Precise measurements and clean cuts contribute to a secure and functional taping application․
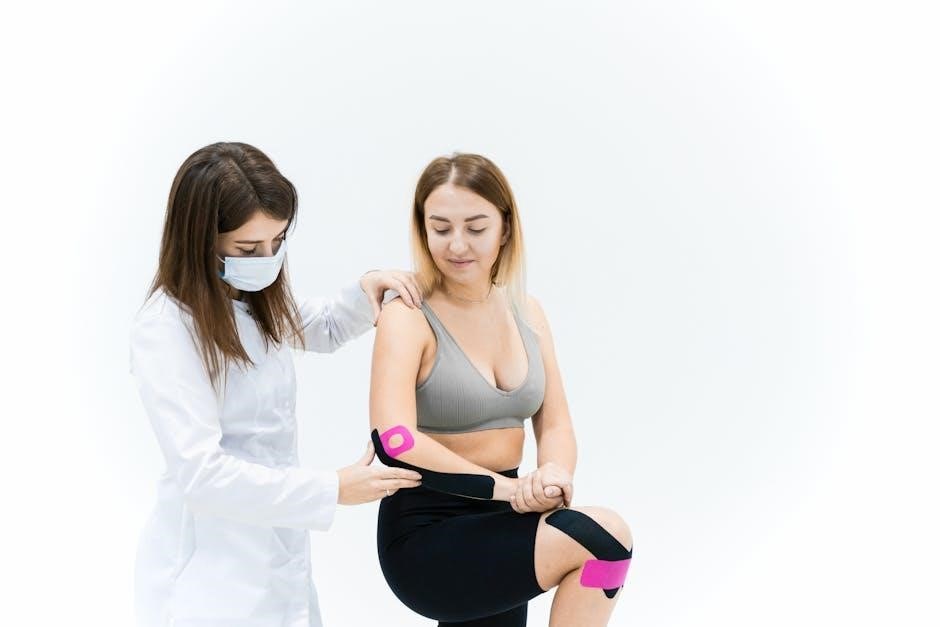
Step-by-Step KT Tape Application Techniques
Successful KT Tape application relies on mastering fundamental techniques․ Before applying any strip, ensure the skin is clean and dry, as detailed previously․ Begin with the anchor – typically applied with zero to minimal stretch․ This provides a stable base for the tape․ The middle portion, covering the affected area, is applied with a moderate stretch (50-75%), depending on the desired level of support and decompression․
Finish with the end anchor, also applied with minimal stretch․ Rub the tape firmly after application to activate the adhesive․ Remember to avoid bunching or wrinkling the tape, ensuring a smooth, consistent application․ Practice these techniques to build confidence and achieve optimal results․ Proper technique maximizes the benefits of KT taping․

Basic “I” Strip Application for Support
The “I” strip is the foundational technique for providing direct support to the patellar tendon․ Measure a strip of KT Tape long enough to extend from the upper portion of the shin, just below the tibial tuberosity, to several inches above the kneecap․ Round the edges of the tape to prevent premature peeling․ Apply the anchor (the first inch) to the skin just below the tibial tuberosity with zero stretch․
From there, apply the middle portion of the strip with 50-75% stretch, guiding the tape directly over the patellar tendon towards the inferior pole of the kneecap․ Finish with the final inch applied with zero stretch․ Rub the tape vigorously to activate the adhesive․ This “I” strip provides compression and support, aiding in pain reduction and improved function․
“J” Strip Application for Decompression
The “J” strip technique aims to lift the skin around the patellar tendon, creating space and reducing pressure․ Measure a strip of KT Tape long enough to wrap around the kneecap, forming a “J” shape․ Start with the anchor (first inch) applied just medial to the patellar tendon, below the kneecap, with zero stretch․
Apply the tape around the kneecap with 50-75% stretch, following the curve of the patella․ As you approach the lateral side of the knee, create the “tail” of the “J”, applying it with zero stretch․ Rub the tape firmly to activate the adhesive․ This technique gently lifts the surrounding tissues, promoting fluid drainage and reducing pain by decompressing the tendon․
Anchor & Lift Technique Explained
The anchor & lift technique is fundamental to effective KT taping․ Begin by applying the first inch of KT tape – the ‘anchor’ – with absolutely no stretch to the skin․ This provides a stable base․ From the anchor, transition to applying the remainder of the tape with a moderate (50-75%) stretch․

As you apply the stretched portion, gently lift the skin with the tape․ This creates subtle space, reducing compression and encouraging lymphatic drainage․ The lifting action is crucial; it’s not just about the stretch․ Rub the tape firmly after application to activate the adhesive and ensure the lift is maintained, providing support and pain relief․
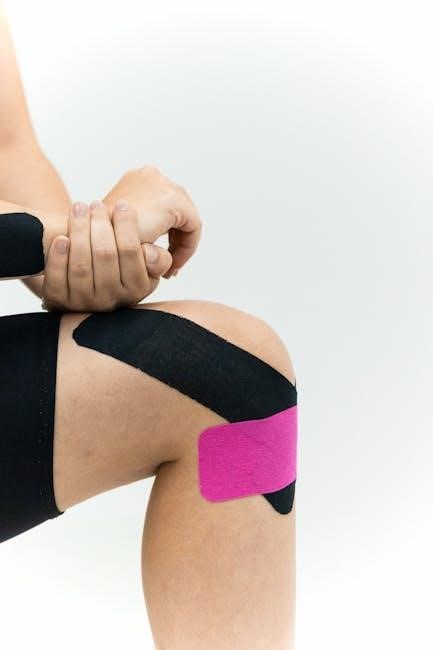
Specific KT Tape Applications for Patellar Tendonitis
Targeting pain requires tailored application․ For discomfort below the kneecap, utilize an “I” strip, anchoring below the patella and extending down the patellar tendon with a moderate lift․ This supports the tendon and reduces strain․
If pain centers at the kneecap’s attachment, a “J” strip is ideal․ Anchor laterally, curve around the patella, and apply along the medial side, creating decompression․ Ensure a gentle lift to offload the tendon․ Experiment with strip direction and tension to find optimal relief, always prioritizing comfort and avoiding constriction․ Proper application maximizes benefits․
Application for Pain Below the Kneecap
To address pain localized below the kneecap, begin with an “I” strip application․ First, measure approximately 6-8 inches of KT tape․ Anchor the tape approximately 2-3 inches below the inferior pole of the patella, ensuring the skin is clean and dry․ Apply the tape directly over the patellar tendon, extending downwards towards the tibial tuberosity․
With 25-50% stretch, gently apply the tape, avoiding excessive tension․ Round the ends of the tape to prevent peeling․ This provides direct support to the tendon, reducing stress during activity․ Monitor for any skin irritation and adjust tension if needed․ Repeat with a second strip if additional support is desired, slightly offsetting it from the first․
Application for Pain at the Kneecap Attachment
For pain specifically at the kneecap’s inferior attachment, a modified “J” strip application is beneficial․ Measure approximately 8-10 inches of KT tape․ Anchor the tape with no stretch just above the patella, flanking the tendon’s origin․ Apply 50-75% stretch as you curve the tape around the patella’s lower edge, following the tendon’s path․
The tails of the “J” should adhere to the skin below the kneecap, providing a lifting effect․ This decompression helps alleviate pressure on the irritated tendon attachment․ Ensure the skin remains smooth during application․ Consider a second strip mirroring the first for enhanced support․ Observe for any discomfort or skin reaction․
Post-Application Care & Wear Time
Following KT tape application, avoid excessive stretching or strenuous activity immediately․ Allow the adhesive to fully bond with the skin – typically 30 minutes – before engaging in exercise․ You can shower or bathe with the tape on, but avoid harsh soaps or scrubbing directly on the tape․ Generally, KT tape can be worn for 3-5 days, even during multiple activities․
Monitor your skin for any signs of irritation․ If redness, itching, or blistering occurs, remove the tape immediately․ Optimal wear time depends on individual activity levels and skin sensitivity․ Remember, KT tape is a supportive tool, not a cure; continue with prescribed rehabilitation exercises․
How Long Can You Wear KT Tape?
Typically, KT tape can remain applied for 3 to 5 days, offering continuous support during various activities․ However, this duration isn’t rigid and depends on individual factors like skin sensitivity, activity level, and the tape’s adhesive quality․ Some individuals may experience skin irritation sooner, necessitating removal after 24-48 hours․ Conversely, those with less sensitive skin and lower activity levels might comfortably wear it for the full 5 days․
Observe your skin daily for redness, itching, or blistering – signs indicating it’s time to remove the tape․ Avoid exceeding 5-7 days of continuous wear to prevent skin breakdown․ Remember, KT tape is a temporary aid; consistent rehabilitation is crucial for long-term recovery․
Removing KT Tape Properly

Proper removal minimizes skin irritation and discomfort․ Start by gently peeling the tape back slowly, in the direction of hair growth․ Avoid ripping it off quickly, as this can cause skin trauma and leave adhesive residue․ Using baby oil, mineral oil, or a commercially available adhesive remover can significantly ease the process, saturating the tape before peeling․
For areas with significant hair, consider peeling in smaller sections․ After removing the tape, wash the area with soap and water to eliminate any remaining adhesive․ If any residue persists, gently rub with oil․ Be patient and prioritize skin health during removal; a slow, deliberate approach is key to a comfortable experience․
Combining KT Tape with Other Treatments
KT Tape isn’t a standalone cure; it’s most effective when integrated with a comprehensive treatment plan․ Combining it with physical therapy maximizes benefits, allowing targeted exercises to rebuild strength and improve flexibility while the tape provides support and pain relief․ The RICE protocol – Rest, Ice, Compression, and Elevation – complements KT Tape beautifully, reducing inflammation and promoting healing․
Consider incorporating anti-inflammatory medications as prescribed by your doctor․ Furthermore, addressing biomechanical factors through orthotics or gait analysis can prevent recurrence․ Remember, KT Tape facilitates recovery, but consistent rehabilitation and addressing underlying causes are crucial for long-term success and a return to full activity․
KT Tape & Physical Therapy
Integrating KT Tape with physical therapy creates a synergistic effect for patellar tendonitis recovery․ The tape provides external support, allowing patients to participate more comfortably in therapeutic exercises․ Physical therapists can strategically apply KT Tape before exercise to enhance muscle activation and proprioception, or after to reduce swelling and pain․
Specific exercises, like eccentric strengthening for the quadriceps, become more manageable with KT Tape’s support․ Furthermore, the tape doesn’t limit range of motion, enabling continued rehabilitation․ A skilled therapist will assess your needs and tailor the KT Tape application to complement your individual exercise program, accelerating your return to function and preventing re-injury․
KT Tape & Rest/Ice/Compression/Elevation (RICE)
KT Tape seamlessly complements the RICE protocol – a cornerstone of initial patellar tendonitis management․ Rest allows the tendon to begin healing, while ice reduces inflammation and pain․ Compression, traditionally achieved with a bandage, can be augmented with KT Tape, providing dynamic support without restricting circulation․
Elevation minimizes swelling, and KT Tape can further aid this by gently lifting the skin, creating space and promoting lymphatic drainage․ Unlike traditional bandages, KT Tape allows for continued movement, preventing stiffness․ Applying KT Tape after icing and compression can prolong the benefits, offering sustained support during periods of rest and early rehabilitation, optimizing the healing process․
Troubleshooting Common KT Tape Issues
Even with careful application, issues can arise․ Skin irritation is common, often due to adhesive sensitivity; hypoallergenic tape is a good alternative․ Ensure proper skin preparation – cleaning and shaving – minimizes this risk․ If a rash develops, remove the tape immediately․

Tape failing to adhere is another frequent problem․ Factors include oily skin, sweat, and improper application technique․ Thorough cleaning with alcohol before application helps․ Rounded edges on the tape prevent lifting․ Consider using KT Tape pre-wrap for enhanced adhesion, especially during activity․ Persistent issues warrant re-evaluation of your application technique or consultation with a professional․
Skin Irritation & Allergies
Skin reactions to KT Tape, while uncommon, can occur․ These range from mild redness and itching to more significant rashes and blisters․ The adhesive is the most frequent culprit, particularly for individuals with sensitive skin or known allergies to acrylics or latex․ Hypoallergenic KT Tape options are readily available and recommended for those prone to irritation․
Before full application, perform a patch test on a small skin area․ If irritation develops within 24-48 hours, discontinue use․ Ensure the skin is thoroughly cleaned and dry before applying tape․ Avoid applying tape over open wounds or broken skin․ If a reaction occurs after application, remove the tape immediately and consult a healthcare professional if symptoms persist or worsen․
Tape Not Staying On – Solutions
A common frustration is KT Tape peeling or losing adhesion prematurely․ Several factors contribute to this, including skin oils, sweat, moisture, and improper application․ Thorough skin preparation is paramount – cleaning with alcohol (allowing it to dry completely) removes oils․ Consider using a pre-tape adhesive spray for enhanced grip, especially during strenuous activity or in humid conditions․
Ensure the tape ends are rounded to prevent snagging․ Avoid stretching the tape excessively during application, as this can reduce adhesive contact․ If swimming or showering, expect reduced wear time; reapplication may be necessary․ For persistent issues, try a different KT Tape brand, as adhesive formulations vary․ Proper application technique, as detailed earlier, is crucial for longevity․